
The Elevator Pitch
No web service (including the accompanying app) has brought more value to my life in Switzerland than a subscription to Schweiz Mobile (Switzerland Mobility). In short, if you are active outdoors either walking, hiking, biking, skating, and many more (including new additions for winter options) and want to be able to map out your adventures than the CHF 35/year is one of the best investments you can make.
Switzerland Mobility covers the entire network of non-motorized; covering over 32,000 km of signposted routes (national, regional, local) and over 60,000 km of hiking trails. The Pro services let’s you create your own routes in a web browser (with all the information about elevation, ascent & descent, etc) and synchronize those routes to your mobile phone. There is so much to cover with this service that I’m going to focus on the functionalities and experience as a hiker.
 Functionalities and Scenarios
Let’s tackle the scenarios first: very often for myself or with friends I want to find a place to hike that within an hour or so drive, provides great views of the surrounding lands, and gets the blood pumping. When I first moved to Switzerland I found it hard to find detailed information beyond the most popular area hikes. Now, with Switzerland Mobility I have access to their tour creation tool which can most easily be done in a full browser on a PC or Mac. I’m going to talk all of this from the perspective of someone who has the yearly subscription to use all the available tools.
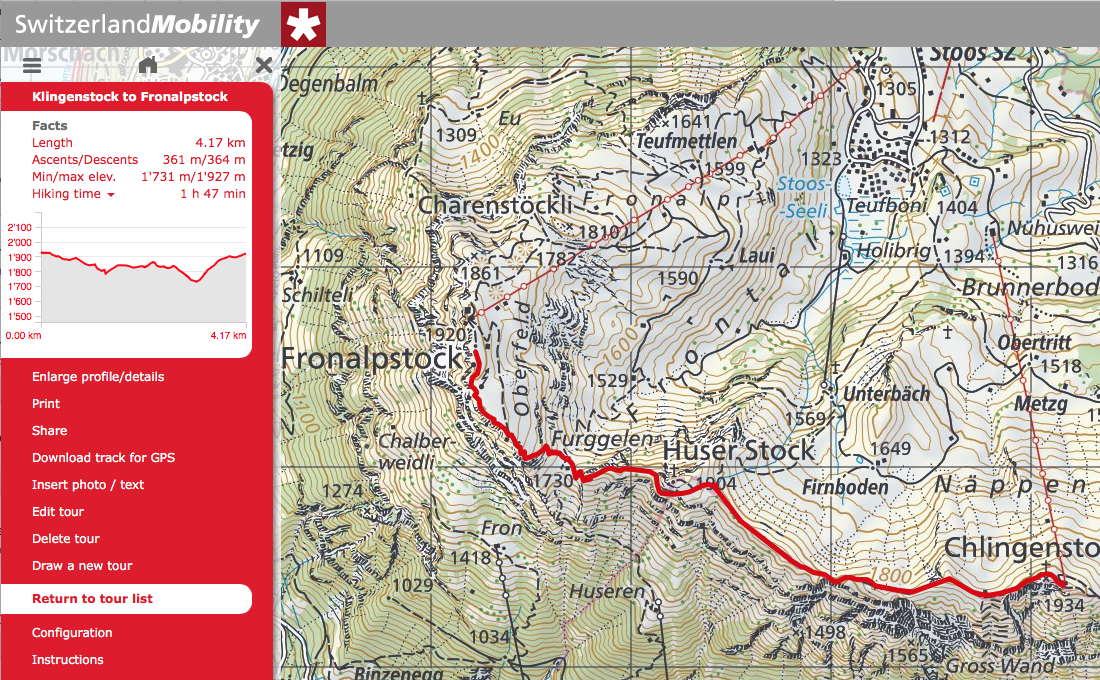
The Map
The interface is really just a large, detailed map of the country. You can move it around with your mouse, zoom in (the more you zoom the more detail). In the left navigation you can select which routes you want to overlay on the map. Selecting “Hiking in Switzerland” fills the map with green lines representing all the available trails. Many of the routes (usually thicker green lines) have additional information because the trail is a national, regional, or locally defined route. The shorthand is this: a single number trail is a national one, two numbers denote a regional trail (like the Swiss Way), and three numbers mark a local trail.
 Creating your own tour
After you have logged in with your subscription you’ll see a red link at the top of the left navigation called My Tours. Click on that and then click on Draw a new tour. In the next screen you can give it a name (which will be useful once you have mapped a lot of routes and need to find them later). “Magnetic routes” should be checked as it makes mapping your route easier. You may notice that your cursor is a red box. At this point you will want to either use the zoom in/out buttons in the lower right side and a click-and-hold to move the map around. Once you know where your route will start click once on the map. If you make mistakes you can always select Delete your last point in the left nav.
Because you have “Magnetic routs” turned on your second click on the map will start building a route based on the green line that connects your first and second click. With two points on your route you can now start seeing the statistics for your route as you build it
- length (in km)
- ascents / descents (good if you want to do a hike within a certain level of difficulty)
- min/max elevate
- hiking time (using the standard calculation seen on hiking signposts throughout the country)
- an elevation/distance graph (if you click on this and mouse over the spot you pick on the graph will also be tracked on the map with a red marker)
Continue clicking the map to and watch how the trail builds itself up along the green lines of the available trails. As always you can undo your last clicks and when you are done click Save. This route will now be available for sync onto your mobile phone via the Switzerland Mobility app.
National / Regional / Local Routes
Many routes on the map are defined trails that have additional information (and often are organized in sections). As you move around the map often the thickest of green lines mark a trail that has a write-up with more info; whether it is a themed trail or has some other significance. By clicking the map you’ll get a small popup with the name of the trail. Clicking again will bring up a left-side bar with the summary. Clicking “Directions” will take you to a new tab with a wealth of details, a photo gallery, signalization and usually a link to the specific resort area where the trail is located.
You can spend hours and hours reading about all the themed trails in Switzerland. It’s a wonderful way to plan out your next outdoor adventure.
 The App
The mobile app which covers the service can be used without a subscription but it is much more useful with one. After logging in with your account you can select My Routes and download all of the tours you’ve designed with the browser tool. Since the app uses your phone’s GPS this is a handy thing to have while on the trail as sometimes the map will make sure you are staying on the route you designed. The usual pinch and zoom gestures let you navigate the map as you need.
User Experience
This is a tale of two cities as the browser tool is a joy to use and you can find yourself playing around with it for hours while the app is fairly basic and I mostly use it to download my routes and make sure I keep to the trail I’ve mapped out. You can’t create new routes on the mobile app although you can read about the themed trails on the app as you do in the browser version. Your phone’s GPS keeps the map centered on our location.
For me, I use the full browser version for all of the heavy lifting (and research) while the mobile app provides me with my routes on-the-go. I’d love to see the app get a from-scratch redesign but for now it serves its single purpose well enough to be useful.
Price : Free (but for full features purchase a CH 35/year subscription


